Select2 and Laravel: Ajax Autocomplete
Warning: This post is over a year old, so some of this information may be out of date (Select2 v4.0.3 and Laravel 5.2 were used).
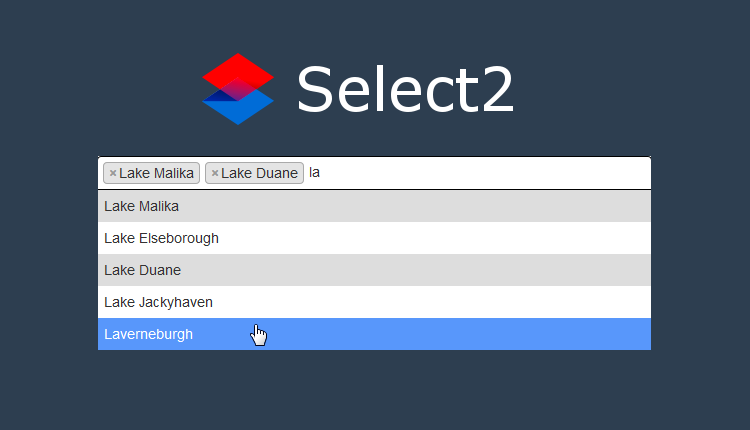
In this post I will show you one way of implementing Ajax auto-completion using Select2 and Laravel. To get started, let's create an Eloquent model in app/Tag.php and generate a database migration:
php artisan make:model Tag -m
The newly created migration can be found in your database/migrations directory and is named something like: 2016_10_06_170336_create_tags_table.php (obviously, the timestamp part will be different depending on the actual date and time of creation). Let’s add a name column:
<?php

use Illuminate\Support\Facades\Schema;
use Illuminate\Database\Schema\Blueprint;
use Illuminate\Database\Migrations\Migration;

class CreateTagsTable extends Migration
{
    /**
     * Run the migrations.
     *
     * @return void
     */
    public function up()
    {
        Schema::create('tags', function (Blueprint $table) {
            $table->increments('id');
            $table->string('name')->unique();
            $table->timestamps();
        });
    }

    /**
     * Reverse the migrations.
     *
     * @return void
     */
    public function down()
    {
        Schema::dropIfExists('tags');
    }
}
… and run the migrations:
php artisan migrate
The next step is to specify a fillable attribute on the app/Tag.php model:
<?php

namespace App;

use Illuminate\Database\Eloquent\Model;

class Tag extends Model
{
    /**
     * The attributes that are mass assignable.
     *
     * @var array
     */
    protected $fillable = ['name'];
}
Of course, in real-world applications you would probably have some Eloquent relationships such as many-to-many, where one tag may belong to many posts, while one post can have multiple tags. However, for the sake of simplicity, we will ignore such relationships in the rest of this post.
Introduction to Eloquence
Eloquence is a package that contains extensions for the Laravel’s Eloquent ORM. One of them is Searchable extension which provides a fast and effective way to search through any columns on the model's table or any of its relations (no-matter-how-deeply-nested) and return the result sorted by search relevance (with possible weight for each column).
In order to install this package, you need to specify it in your composer.json:
    "require": {
        "sofa/eloquence": "~5.3", // for Laravel 5.3.*

        // OR
        "sofa/eloquence": "~5.2", // for Laravel 5.2.*

        // OR
        "sofa/eloquence": "~5.1", // for Laravel 5.1.*

        // OR
        "sofa/eloquence": "~0.4", // for Laravel 5.0.*
        ...
    },
and run the composer update command.
Next, add Sofa\Eloquence\ServiceProvider::class to your providers array in config/app.php. Finally, use Eloquence trait in the app/Tag.php model and specify the default searchable column:
<?php

namespace App;

use Illuminate\Database\Eloquent\Model;
use Sofa\Eloquence\Eloquence;

class Tag extends Model
{
    use Eloquence;

    protected $searchableColumns = ['name'];

    /**
     * The attributes that are mass assignable.
     *
     * @var array
     */
    protected $fillable = ['name'];
}
Programming the Client-Side
Let’s define a blade view in resources/views/tags.blade.php. It will have a simple HTML form with one <select multiple> tag:
<!doctype html>
<html lang="en">
<head>
    <meta charset="utf-8">
    <meta http-equiv="X-UA-Compatible" content="IE=edge">
    <meta name="viewport" content="width=device-width, initial-scale=1">
    <meta charset="UTF-8">
    <title>Select2 Ajax Example</title>
    <link href="https://maxcdn.bootstrapcdn.com/bootstrap/3.3.6/css/bootstrap.min.css" rel="stylesheet">
</head>
<body>
    <div class="container">
        <div class="row">
            <div class="col-md-4">

                <form>
                    <div class="form-group">
                        <label for="tag_list">Tags:</label>
                        <select id="tag_list" name="tag_list[]" class="form-control" multiple></select>
                    </div>
                </form>

            </div>
        </div>
    </div>

    <script src="https://cdnjs.cloudflare.com/ajax/libs/jquery/2.1.4/jquery.min.js"></script>
    <script src="https://maxcdn.bootstrapcdn.com/bootstrap/3.3.6/js/bootstrap.min.js"></script>
</body>
</html>
The next step is to include the JavaScript and CSS files of Select2 jQuery plugin, and apply the following script:
$('#tag_list').select2({
    placeholder: "Choose tags...",
    minimumInputLength: 2,
    ajax: {
        url: '/tags/find',
        dataType: 'json',
        data: function (params) {
            return {
                q: $.trim(params.term)
            };
        },
        processResults: function (data) {
            return {
                results: data
            };
        },
        cache: true
    }
});
If you look at this jQuery code, you can see that it sends an asynchronous HTTP (Ajax) request to /tags/find using the GET method (the default for Select2). The ?q=value query string is also appended to the request URL. For example, if we enter “test”:
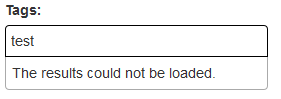
the GET request will look something like this:
![]()
So, here's the final version of resources/views/tags.blade.php:
<!doctype html>
<html lang="en">
<head>
    <meta charset="utf-8">
    <meta http-equiv="X-UA-Compatible" content="IE=edge">
    <meta name="viewport" content="width=device-width, initial-scale=1">
    <meta charset="UTF-8">
    <title>Select2 Ajax Example</title>
    <link href="https://maxcdn.bootstrapcdn.com/bootstrap/3.3.6/css/bootstrap.min.css" rel="stylesheet">
    <link href="https://cdnjs.cloudflare.com/ajax/libs/select2/4.0.3/css/select2.min.css" rel="stylesheet" />
</head>
<body>
    <div class="container">
        <div class="row">
            <div class="col-md-4">

                <form>
                    <div class="form-group">
                        <label for="tag_list">Tags:</label>
                        <select id="tag_list" name="tag_list[]" class="form-control" multiple></select>
                    </div>
                </form>

            </div>
        </div>
    </div>

    <script src="https://cdnjs.cloudflare.com/ajax/libs/jquery/2.1.4/jquery.min.js"></script>
    <script src="https://maxcdn.bootstrapcdn.com/bootstrap/3.3.6/js/bootstrap.min.js"></script>
    <script src="https://cdnjs.cloudflare.com/ajax/libs/select2/4.0.3/js/select2.min.js"></script>
    <script>
        $('#tag_list').select2({
            placeholder: "Choose tags...",
            minimumInputLength: 2,
            ajax: {
                url: '/tags/find',
                dataType: 'json',
                data: function (params) {
                    return {
                        q: $.trim(params.term)
                    };
                },
                processResults: function (data) {
                    return {
                        results: data
                    };
                },
                cache: true
            }
        });
    </script>
</body>
</html>
Programming the Server-Side
Create a TagController by running php artisan make:controller TagController, and add a find method to handle autocomplete queries:
<?php

namespace App\Http\Controllers\Select2Ajax;

use App\Tag;
use Illuminate\Http\Request;

use App\Http\Requests;
use App\Http\Controllers\Controller;

class TagController extends Controller
{
    /**
     * @param Request $request
     * @return \Illuminate\Http\JsonResponse
     */
    public function find(Request $request)
    {
        $term = trim($request->q);

        if (empty($term)) {
            return \Response::json([]);
        }

        $tags = Tag::search($term)->limit(5)->get();

        $formatted_tags = [];

        foreach ($tags as $tag) {
            $formatted_tags[] = ['id' => $tag->id, 'text' => $tag->name];
        }

        return \Response::json($formatted_tags);
    }
}
Let’s analyze this method:
We are using $request->q to retrieve the value from the query string. At the time of writing this post, Select2 (version 4.0.3) doesn’t provide any elegant way to prevent requests from being sent if a user enters only spaces (by pressing the spacebar). So, after trimming the whitespace, we need to check if the term is empty. If that's the case, the method returns an empty JSON response to Select2. Otherwise, we use the search method (from Eloquence trait) to look for the term through name column on the app/Tag.php model's table. The limit method is used to restrain the number of results returned from the query.
At the end, we format and return the JSON response. Note that Select2 "understands" the format which is a JavaScript array of objects with the id and text properties (e.g. [{id:0,text:'enhancement'},{id:1,text:'bug'},{id:2,text:'duplicate'},{id:3,text:'invalid'},{id:4,text:'wontfix'}]).
The id and text properties are required on each object, and these are the properties that Select2 uses for its internal data objects.
As a final step, we need to define routes - one for displaying the page with the input for selecting tags, and the other for handling the Ajax requests:
Route::get('/tags', function() {
    return view('tags');
});
Route::get('/tags/find', 'TagController@find');
And that’s it. In order to test this, we need data, so let’s use model factories to generate some dummy database records which will represent tags. Add the following factory definition for the app/Tag.php model in database/factories/ModelFactory.php:
$factory->define(App\Tag::class, function (Faker\Generator $faker) {
    return [
        'name' => $faker->city
    ];
});
Run php artisan tinker and then create several model instances and save them to the database: factory(App\Tag::class, 50)->create();. At this point you should be able to open it and test if it's working as expected:
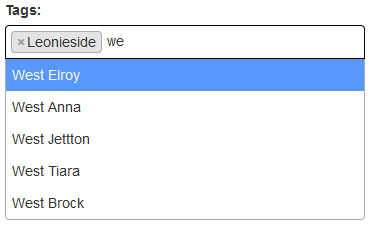
Or click here for a demo. Gist is available here.
IMPORTANT: If you are getting SQLSTATE[42000]: Syntax error or access violation, the most likely reason is the MySQL strict mode. To disable it, open your config/database.php and in the connections.mysql section set 'strict' to false:
    'connections' => [
        'mysql' => [
	   …
            'strict' => false,
	   …
        ]
    ]
For more information about Laravel and MySQL strict mode, I recommend you to read the following article: "Strict" mode and other MySQL customizations in Laravel 5.2 (written by Matt Stauffer).
Please note that this post only explains one of the many possible ways to implement Ajax autocomplete using Select2 and Laravel. In real-world applications you will need many other features such as the ability to create and delete tags or, for example, when you select certain tags - to submit the form and attach them to some entity such as blog post, article or product. If you want to learn these things and more, I strongly recommend the following series: https://laracasts.com/series/laravel-5-fundamentals
Warning: This post is over a year old, so some of this information may be out of date (Select2 v4.0.3 and Laravel 5.2 were used).
Newsletter
Subscribe to my weekly Newsletter and stay tuned.